You’ve no doubt heard the terms and concepts used to describe inflatable paddle board construction technologies that seem like a marketing jargon, especially because nobody really explains what they actually mean.
Let’s try to make sense of that mess.
iSUP Construction Materials
Note that you can skip to any part that peaks your interest, no need to torture yourself by reading through all of it.
1. PVC Material Explained
This is the material inflatable paddle boards are made of. I’ve dug into what PVC is before, and it did help make sense of things years ago.
However, as new inflatable construction technologies have been introduced and the manufacturers copy/emulate/imitate one another whilst the marketers barely explain what the hell they have actually done, things have gotten messier. It doesn’t help that they’re very eager to say that, whatever it is they’ve done, it improves durability, rigidity, and reduces weight of the inflatable paddle board… By how much and/or compared to what and at what cost, often times that’s the part left to our imagination. And while drinking champagne on their yachts as the price is upped by upwards of 13x, you start to wonder if 20% change in construction quality for the better is actually worth it.
What is PVC?
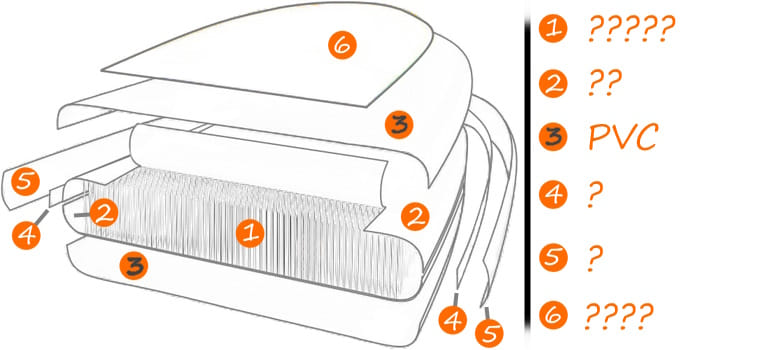
On its own, PVC (polymerized vinyl chloride) is a durable lightweight and cheap plastic material. From what I’ve seen, it can be found in all inflatable paddle boards.
By default, it’s a relatively rigid material (imagine PVC pipes), but with the addition of plasticizers, PVC becomes more flexible. Simply put, PVC used in iSUPs is full of all kinds of additives making it flexible, increasing its resistances to abrasions and weather effects (UV, melting point, etc), among other things.
For context, by default, sun’s UV rays are PVC killers. In other words, without the additive, the PVC would become brittle and just break apart faster, but since the additive is there, all you’re going to experience is discoloring after months or years of constant exposure, depending on quality, and that too only on the very outer part of such a PVC layer (that’s how this makes sense).
As a sidenote, in case you wanted the colors to last longer, you could simply apply actual sunscreen on the board …Yeap, you did hear me right. Here’s some more iSUP care and maintenance tips.
PVC linear mass density (500D vs 1000D)
The most common PVC layer density I’ve come across used in iSUPs is 500D and 1000D. D stands for Denier, a textile measurement unit.
Simply put, 1000D is heavier and more dense, but also more durable than 500D. In other words, bigger is stronger, but weighs more. That’s why we see thicker and stronger PVC and thus heavier inflatable paddle boards used in more extreme areas of SUP (e.g river riding), and thinner PVC and thus more lightweight boards that are more prone to damage in comparison used in flatwater paddling where bumping into rocks or being crushed under waves happens much less often. In case you’re interested: explanation, and demonstration.
PVC glue vs regular glue
Unlike regular glue, PVC solvent cement, referred to as PVC glue, acts differently. It breaks down or dissolves some of the PVC that it’s in contact with and upon re-solidifying acts as one piece altogether. It’s not going to peel off, it’s going to rip apart. It’s sometimes referred to as “cold welding”.
But that’s only if it’s done right. Applied with human error or machine malfunction sprinkled in, it acts more like a regular adhesive in those parts where the bonding didn’t quite happen for some reason, not strong enough to withstand the air pressure and eventually peeling off from such a spot leaving behind a little wheezing air hole or forming an air bubble underneath the PVC layer of the inflatable paddle board. Both I’d consider manufacturing defects eligible for a warranty claim. If it surfaces after the warranty period is over with, you’re finally free to fix it yourself.
PVC glue shelf life vs warranty period
Funny thing to note: PVC glue tends to have a shelf life of about 2-3 years (and that’s with the better quality ones). That means that if it didn’t form the correct bond between the PVC elements (with the correct bond, it’ll outlive you), then it’s going to start to peel off after those 2-3 years are up in those spots where the bond didn’t form correctly, coincidentally in exactly the amount of time most warranty periods of iSUP brands already have or are about to run out.
This is why it can matter when the iSUP company says that they’ve used higher quality PVC glue and more sophisticated gluing methods or technologies to form a better bond (brands with longer track record tend to have tested many glues and applying processes over the years and generally know which tend to give the best result). But without the specifics, it’s almost as good as glorified static noise, much in the same vibe as “it’s just a joke, bro” or “trust me, bro”, simply just in a corporate suit, while conveniently providing a warranty period, and you guessed it, of 2 to 3 years.
2. Drop-Stitch Material Explained
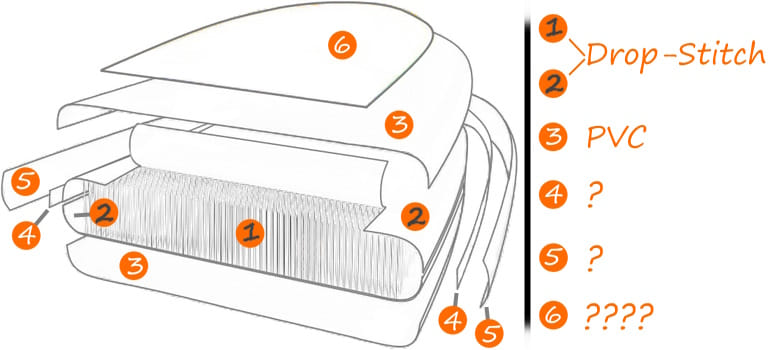
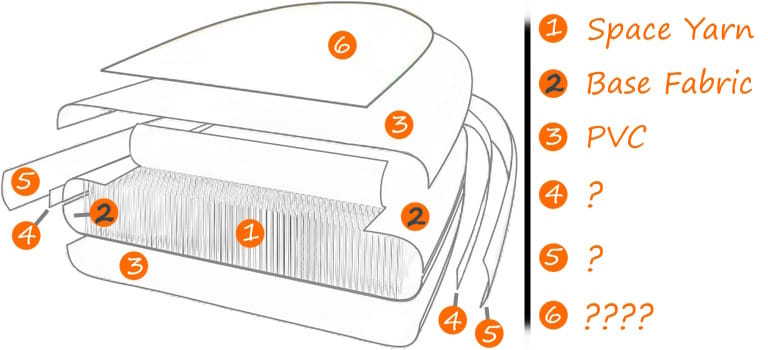
Drop-stitch material, or Double Wall Fabric, consists of 2 layers of fabrics (or base yarn) stitched together using tens of thousands of synthetic fabric threads (or space yarn). This is what allows the inflatable paddle board to maintain its shape when inflated. At least that’s the gist of it.
Space yarn (the threads)
These drop-stitch threads (space yarns) can be spaced more sparsely or more densely (depending if they want to achieve lighter weight for the inflatable paddle board or not), of varying thickness (usually 500D), and the pattern can be different as well (linear vs X vs V vs wave pattern). Usually made of polyester (synthetic fabric, a kind of plastic) because it’s cheap, stretch resistant, and abrasion resistant, among other things.
The thicker the threads and more densely they’re spaced, the higher pressure (PSI) the iSUP can hold assuming the rest of the construction elements can, too.
Knitted vs woven base yarn (the 2 fabric layers)
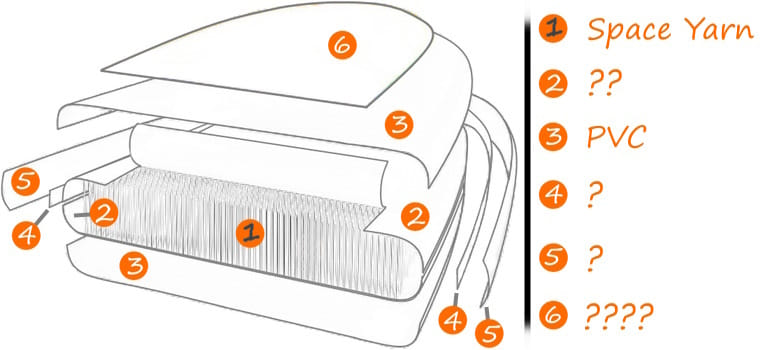
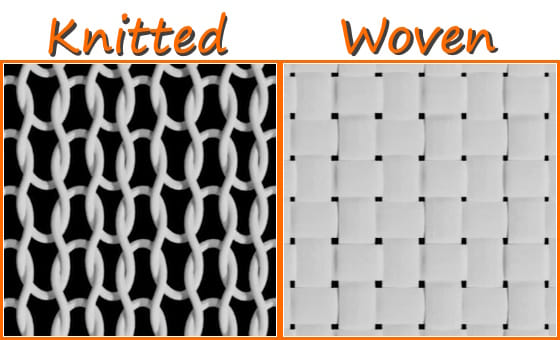
The space yarn is attached to the base yarn by a drop-stitch machine with a bunch of needles in much in the way the name, drop stitch, implies. There’s 2 types of base yarns that I’ve seen talked about: woven base fabric and knitted base fabric. The base fabric, much like the threads, is also made of polyester, usually.
The woven base fabric is superior to the knitted one because it simply has less room to stretch (visually explained). Woven fabric also weighs less by about 20%. That means the inflatable paddle board feels more rigid and sturdy, less flex in the board when you stand on it or hit a wave. Also, it takes a drop-stitch machine almost twice as long to weave a woven base fabric than a knitted one. On top of that, the process is a little more sophisticated, too, and so it usually comes out more expensive than the knitted base fabric.
iSUP Construction Methods
I personally tend to count the PVC layers specifically. Anything else, it feels like, is creating unnecessary confusion (intentionally or unintentionally).
In my opinion, this would be the most transparent way of looking at inflatable paddle board construction elements. This way all you’d need to know is what the materials are, how thick they are, and how are they connected (manually glued vs coated vs machine laminated – difference explained a little further down below). This would allow us to simply measure and compare all the products rather than rely on the marketing buzzwords and fantastical random nicknames that might sound cooler than the competitor’s cool nickname used for the construction method of their inflatable paddle board.
This is how the layers seem to be applied:
- Mesh layer (base yarn/fabric/cloth)
- 1st PVC layer
- Mesh layer
- 2nd PVC layer
- Mesh layer
- 3rd PVC layer
- etc.
Analogous to having a plaster mesh for plastering a wall. Without the mesh, the bond is just not as good and it’s going to crack and crumble on itself.
And so, from what I can tell, the adhesive mesh layer improves PVC layer bonding.
How to count the layers?
The mesh layer has many names: adhesive layer, base cloth, air-tight coating, in other words, anything other than PVC layer specifically. And the additional layers can be either machine laminated, coated, or hand glued together.
Let’s say all the layers in an iSUP are referred to as PVC layers in the marketing text. To make sense of it, you can just count them yourself, starting from the outer-most layer, which is usually always a PVC layer (if you don’t confuse the EVA foam deck pad or picture/logo prints with one of the layers), and probably end up with the right conclusion going inward using the mesh-pvc-mesh-pvc layering concept.
Layer thickness
I’ve seen mesh layers as thin as 0.1mm. The PVC layer itself can be anywhere from 0.4mm to 0.7mm thick (or more), and either 500D or 1000D dense (because these are the only ones I’ve ever seen mentioned).
TERMINOLOGY CLARIFICATION:
What is machine laminated PVC?
It’s where the PVC along with the other layers are heat pressed together at high pressure, forming a strong bond.
What is coating of PVC?
It’s where the PVC is melted to its liquid state and then spread across the fabric/adhesive layer, forming a strong bond.
What is manual gluing of PVC?
It’s where the PVC glue is applied to the 1st layer and then the 2nd layer is slapped onto it, forming a strong bond.
Machine laminating vs manual coating vs gluing
As to which PVC material bonding method is the best, the consensus is all over the place. Whoever uses which method claims theirs to be the best even across different fields. In my opinion, machine laminating seems the best because it leaves little room for errors, but the problem is that every1 seems to use ultra thin layers in the process.
What is a sandwich layer?
Brands tend to call a machine laminated fusion layer (pvc + mesh + pvc) a “sandwiched” layer because it’s heat pressed into 1 layer, the sandwich layer. I still like to count them all separately and simply note the connection type. Makes sense and clears things up.
1. Single-Layer Construction Explained
This is the most basic iSUP construction method and involves the drop-stitch core and a single layer of PVC laminated on top of that. At the seams, there is either 1 or 2 layers of PVC rail tape manually glued to connect the top and bottom layer of the single-layer PVC together.
Drop-stitch core
The space yarn (the drop-stitch threads) tend to have a linear pattern along with other basic attributes, and the base yarn (top and bottom fabric layer) is usually always knitted unless stated otherwise. The base yarn is not airtight.
Single PVC layer
Nowadays the PVC layer seems to already be pre-laminated to the fabric layer (base yarn) at the fabric factory (usually separate from the companies actually putting the inflatable paddle boards together). Unless stated otherwise, it’s safe to assume it’s no thicker than 1mm.
They cut the laminated PVC layer into shape, add prints (a logo, graphics, etc) and then start the gluing process.
Gluing process
Unless stated otherwise, the gluing process at the rails is done manually which can introduce human error(s) into the mix. And if you read about the nature of PVC glue (under PVC Material section), you know why it might become a problem in the inflatable paddle board construction.
They glue on the rail tape to connect the top and bottom half of the laminated PVC layer cut-out. They might glue onto that another rail tape for reinforcement. Additionally, they glue on the deck grip pad, same with fin box(es), D-ring(s), carry handle, grab handle(s), etc.
Concerns
It all might seem scary, but for average to smaller paddlers in calm flatwater conditions it’s completely fine (because you won’t have that much flex in the iSUP board, etc). The only thing to watch out for is that the brand should have a long enough track record (at least the warranty duration +1 year) and that other real people already bought the board to test it for that duration. If no red flags are seen, customer support seems active… And if it suits your needs (it’s got the right price, shape, dimensions, weight cap, features, accessories are tolerable, etc), why the hell not.
If the gluing process went well and a good bond got to form, you’ll likely get to see the colors start to fade due to the sun UV rays before any actual problems arise. If the warranty is over and the PVC glue’s shelf life starts to run out and the EVA foam deck grip pad or one of the D-ring PVC patches start to peel off, or a few little holes show up at the rail seams, you can get a little cup of PVC glue and simply re-attach them yourself.
It’s only bad when that little hole at the rails ends up being a little too big and it ends up ripping apart the inflatable paddle board from the surrounding well-bonded connections due to the air pressure, as that’d probably be impossible to repair if it’s now, in its hypothetical sense, properly ripped apart…
2. Double-Layer, Triple-Layer, Etc, Explained
No1 ever calls their iSUP construction a double-layer or triple-layer and so forth anymore. The waters are muddied.
Hardly any1 shares the specifics either. I guess it would look bad if they used the (0) default version to describe their construction, so they come up with the cool nicknames instead of providing the actual specifics and processes. That way you can’t tell whether the build is bad or overpriced. It’s a problem because all the cheaper copycat brands entered the market and used the same marketing trick to hide the facts…
In my opinion, an actual double layer would be like this (0):
- Base yarn
- 1st PVC layer (machine laminated)
- Mesh layer
- 2nd PVC layer (coated or glued)
As for the thickness, material, and gluing processes… That’s the muddied part.
It could be like this (1):
- Knitted base yarn
- 1st PVC machine laminated layer | 0.5mm, 500D
- Adhesive layer (just glue)
- 2nd PVC hand glued layer | 0.5mm, 500D
OR like this instead (2):
- Woven base yarn
- 1st PVC machine laminated layer | 0.7mm, 1000D
- Fabric mesh layer (+glue)
- 2nd PVC coated layer | 0.7mm, 1000D
The 1st build would be thinner, thus lighter and weaker, along with a regular glue bond (more risk for human error).
The 2nd build would be thicker, thus heavier and stronger, along with a better glue bond (less risk for human error).
Is a double-layer build the best?
The double-layer build can be the best if the materials, thicknesses, and connection processes were of the good quality. It’s because adding more layers will simply increase the cost while adding diminishing returns. But it can be as bad as any other if the materials were ultra thin and connection processes poorly done.
3. Fusion Double-Layer Construction Explained
Personally I’d call it a triple-layer build, albeit thin (based on the amount of PVC layers). And the way I understand it is that all the layers are machine laminated (a.k.a fused) at the fabric factory level.
It’s called a fusion double-layer because of the construction process, I guess, in which you’ve got the (1-2) 1st pre-laminated layer (base yarn + PVC layer), then the (3) adhesive layer, and finally the (4-6) 2nd pre-laminated layer (PVC layer + mesh layer + PVC layer) a.k.a sandwich layer carefully laminated onto the 1st pre-laminated layer with the adhesive layer in-between. Something like that, the exact processes can vary.
- base yarn
- PVC layer
- Airtight adhesive layer
- PVC layer
- Mesh layer
- PVC layer
Is it worth it?
It’s a more sophisticated process when compared to the single layer laminate, sure, and it probably costs more as well because of the machinery involved. On the other hand, the process should be way faster than the double-layer manual coating and/or gluing process, which should save costs on labor.
However, for some reason every1 doing the fusion construction uses as little amount of materials as possible. That means thinner layers, probably 0.5mm and 500D at most. Maybe the machine just can’t do thicker… Then in their marketing text they boast about how they were able to cut back on materials used and make the board weigh less by a few pounds. Personally, I’d rather have the few-pounds heavier, sturdier, more durable version of the board if the cost was about the same. This whole thing smells a lot like marketing.
Lack of concrete information
I wish I could find more info about the manufacturers actually making the base laminated fabric, to see their offerings and price tags in order to put things into better context. The closest thing I could find is this, but apart from the image giving a whiff of an idea, it doesn’t say much at all on the matter. The images of the machine on Alibaba don’t say much either.
4. Stringer Construction Explained
Also called uni-directional (UD) compression center stringer. The idea is this: add not a full extra layer but just a string of PVC (or carbon fiber) going down the middle of the board from nose to tail. Supposedly it makes the board feel more rigid, saves on materials and allows for a few pounds of a lighter board.
Example 1:
- base yarn
- PVC layer
- Mesh layer
- Carbon stringer
- PVC layer
Example 2:
- base yarn
- PVC layer
- Airtight PVC adhesive layer
- PVC layer
- Mesh layer
- Carbon stringer
- PVC layer
Does it work?
The iSUP brands using it are saying that it does while those not using it say it doesn’t. The truth is probably somewhere in the middle. That is, it does improve rigidity a little bit, but not as significantly as a full 2nd layer would.
What’s the catch?
Why not just add a full extra layer to the inflatable SUP? Probably marketing…
Imagine having a super lightweight board while having a unique and different construction element they can use to claim that it’s still better than the version without it (because technically it is better, even if just by a veery little bit). And all they had to do was glue a little strip of something on it. However, it’s probably trickier to implement this construction, so the end-price is higher as well.
Rail Construction Methods
What is it?
The rails are the sides or edges of the board that are made up of 1 or more PVC tapes that connect the top and bottom half of the iSUP together to form an airtight seal at the seams.
Rail layers and thickness
The more layers there are and the thicker the layers are, the more support it adds, making the board more durable and rigid (it will stretch less). However, too thick and too many layers make it harder to roll up when deflated and also adds extra weight to the inflatable paddle board (but only by a few pounds at most).
Weakest link in iSUP construction
If we welded two metal beams together, the weakest link would be the welded connection point. Exactly the same thing with an inflatable paddle board. The weakest links are the seams at the rails. This is where air leakage is most likely to happen due to poor glue bond or too high pressure from overinflation.
BEWARE: heat from the sun can also increase the pressure inside the iSUP, meaning that if the max PSI is 15 and you inflate it to 15, but you leave the iSUP in the sun on a hot day and it increases the air pressure further to 16+ and the valve does not feature a pressure relief system, an oopsie can take place and the warranty will most likely not cover it as it falls under user negligence. That’s a long sentence…
Carbon strips or tape
Apart from PVC tapes and/or strips, there can also be carbon tapes or strips tossed in-between there. Normally, carbon fiber is praised for its rigidity and strength (thus ideal for SUP paddles), but as a seam tape it obviously has to be more flexible and probably stretch just a bit. Such carbon fiber does exist, because.
The amount of rail layers and their thickness, but also the connection quality at the seams largely determine how much air pressure (PSI) the iSUP board can handle.
TERMINOLOGY CLARIFICATION:
Heat welded seams?
As the name implies, it’s where the overlap is bonded with heat. Do note: the very first PVC layer at the rails is almost always bonded with adhesive (at most you might get the bottom overlap heat welded and the upper overlap still bonded with adhesive because of the construction process for inflatables being unique). If anything is heat welded at the seams, it’s usually the additional tape layers or strips on top of the first glued-in layer.
Glued seams?
Same thing, except the overlap is bonded with PVC glue instead.
Heat welding vs gluing at the rails
With the right PVC glue and process, the bond is permanent (“cold welding”). Basically the same result as with proper heat welding. However, if the PVC glue is of poor quality and used as a simple adhesive, then you’re going to end up with this. That said, heat welding is not perfect either, probably: heat too much and you ruin the PVC composition, heat too little and the bond won’t last. If both were done perfectly, I’d like to think that heat welding is slightly superior, but that might just be my bias towards welding speaking because of my bad experiences with the more regular glue not keeping things together when I needed it most…
1. Single Layer Rail Construction Explained
This is the most basic but also the easiest and thus the cheapest way to go. However, it doesn’t leave the inflatable paddle board as rigid nor as durable when compared to a double layer build at the rails.
It’s as it sounds:
The single rail band or rail tape is connected with PVC glue to the top and bottom half of the main layers and thus closing the gap to make the inflatable paddle board airtight.
Drawbacks
While it saves on costs (material + labor) and makes the inflatable paddle board even more lightweight (by less than a pound more like), if the board dimensions were bigger than, say, 10′ x 30″ x 6″, the water condition not calm and flat, and the paddler was heavier than average, the board would have flex (bend) and you’d lose your balance more easily, and the feedback in terms of performance would be less than ideal.
Still usable under the right conditions
Good for very calm, chill, leisurely slow flatwater paddling for a average size adults or smaller and on the cheapest possible budget. It kind of actually does the trick. However and furthermore, the board would have to be smaller in dimensions, around or smaller than 10′ x 30″ x 6″ (length x width x thickness). Note that the thicker the board the more rigid it is, so a 4″ thick inflatable paddle board would be horrible in this case.
REALITY of the situation
Nowadays, I don’t think any1 is actually using an actual single-layer rail build. It doesn’t cost much of anything to add that extra reinforcing layer or two at the rails in order to significantly improve rigidity of the inflatable paddle board. Why would they do that to themselves?
2. Double-Layer, Triple-Layer, etc, Rail Construction Explained
It seems to be pretty straight forward: instead of just 1 layer of PVC, in a double-layer rail construction, there’s 2 layers of PVC, in triple-layer, 3, and so on.
Benefits:
Additional layers of PVC tape at the rails greatly improve durability and rigidity of the inflatable paddle board, assuming the layers weren’t ultra thin and a good bond was allowed to form in the connecting process (during heat welding or PVC gluing).
Drawbacks:
However, additional layers and thickness will make it harder to roll up the inflatable paddle board when deflated.
3. Carbon Rail Bands/Tapes or Strips Explained
So since nobody is actually doing an actual 1-layer rail construction anymore, the big brands had to come up with something to visually differentiate themselves from all the rest. It’s probably because you can’t really compare the connection quality (welding and/or gluing process) as well as you can compare visually clear differences, the amount and thickness of the PVC rail bands.
Introducing carbon rail stiffening construction.
What is it?
It usually comes in the form of carbon fiber strips or tapes. Simply put, it’s a more sophisticated way of reinforcing the rails and securing the seams. This adds to durability and rigidity, but not by too much. It’s basically just a flashier way of adding extra PVC layers at the rails.
Does it actually work?
It’s an extra layer of reinforcement adding to durability and rigidity at the rails, so yes, it works, perhaps a tiny bit better than a PVC layer would (at a much higher cost at that when compared to a simple PVC layer).
4. Carbon Rail Battens Explained
Now this one actually does work. I believe only Red Paddle Co has it though. It’s a patented technology.
It’s a carbon fiber batten (looks like a long ruler) that seems to be less flexible than the built-in carbon rail bands/tapes/strips options are. The batten is inserted into a pocket inside the rail in order to greatly increase rigidity of the inflatable paddle board.
Inflation Valves
Inflation valves are where you pump air into the inflatable stand up paddle board.
Unlike with other inflatable products, iSUPs seem to have just a few inflation/deflation valves in use.
The most common inflation/deflation valve by far is (1) Halkey Roberts (no pressure relief system for iSUPs with this one though).
The second valve I’ve seen used in iSUPs is from (2) Leafield Marine (they have a pressure relief system as a secondary valve that has to be installed alongside the inflation/deflation valve itself).
1. Halkey Roberts (HR) Valve
Most common by far, the Halkey Roberts (HR) inflation valve found in most iSUPs today. I may be wrong, but it costs around $20, give or take a tenner.
Valve wrench – repair kit
Almost every iSUP package using this valve includes a repair kit which includes a valve wrench with which you can screw or unscrew the middle part (stem) of this valve system. You may need to tighten the valve from time to time should it loosen up by too much for whatever reason. There have been a few cases where people freaked out thinking their iSUP was leaking air when really the screwable section had simply unscrewed itself a bit during transportation.
3 elements of the HR valve:
- Cap and nut
Sealing cap and locking/unlocking mechanism below it all together with a sealing ring. - Stem
Screw-in middle section (this is the part the valve wrench is for) with a sealing ring. - Body
The lower-most section attached to the board.
No pressure relief system?
They offer one, but the max PSI it can handle is 4, so no, HR’s pressure relief system seem to not be used in inflatable paddle boards that tend to go up to 15 PSI at a minimum. It’s instead used in other inflatable rafts, kayaks, etc, that go to high PSI.
Pump compatibility
Random pumps won’t be compatible with the HR valve. A random electric air compressor will highly likely not have a compatible adapter either.
The iSUP packages that include just the hand pump generally only come with 1 nozzle attachment that is usually built into the hose (the other end of the hose is generally a screw-in), and it is compatible with whatever valve the board has (highly likely a HR valve). SUP electric pumps however tend to include a bunch of adapters / different nozzle attachments compatible with almost all inflatable paddle board valves (except the rare new oddball valve from an obscure brand trying to be the new Apple of iSUPs or something).
2. Leafield D7/A6 Valve
Leafield Marine D7 drop stitch inflation/deflation valve tends to be coupled with the Leafield Marine A6 pressure relief valve. These cost around $20 and up to $50 respectively, give or take.
Limitations
From what I’ve seen, the pressure relief system seems to be able to handle pressure up to around 20 PSI. The higher the PSI it gets configured for, the more it costs.
Pump compatibility
The nozzle suitable for this valve is different. Again, you either need to use the one that comes with the package or find a compatible adapter separately if you for some reason didn’t fancy using the solution that came with the package. From what I’m seeing, a lot of the more typical SUP electric pumps don’t seem to have a compatible nozzle attachment for this Leafield D7 valve.
3. Other Valves
I haven’t come across any other valves that might be in use in inflatable paddle boards today. It’s mainly only the HR valve that I’ve seen, and in the more rare cases the Leafield valve coupled with its pressure relief valve.
Similar valves with minor variations
At most I’ve seen HR-looking valves that have minor variations to them (e.g color, material), but that might be because of older/newer versions of the valve or custom minor add-ons (e.g push-pin looking different). Maybe they’re renting the patent that allows for smaller modification and customization or something whilst leaving the key elements universal… I haven’t bothered to dig that deep.
Fin Boxes
As the name implies, fin boxes are the things you insert or plug the fins into.
Risks
Problem is not all fin boxes are the same. There are multiple types (4+) of fin boxes inflatable paddle boards tend to use, meaning that not all fins can be plucked into all the fin boxes. Some fins might even be connected to a fin box permanently, meaning that the fin can’t be removed nor replaced without removing the fin box also. Some brands might even fuse such a permanent fin to the board construction itself… And if the fin box was brand-specific, you might end up being one of the guys/gals years from now with a post on Reddit I get to read about on how finding a new/replacement fin to match your otherwise high quality board is impossible simply because the original brand upgraded their systems and none of the older fins are available now.
Which is better?
The benefit of using a more widely used fin box is that you can swap out the fin more easily (more long lasting options). If it’s a good quality fin, you might even want to install it on your next inflatable paddle board as well.
Types of fin boxes: NOTE that the center fin box is usually bigger than the side fin boxes.
- Standard US Fin Box – popular reliable
It’s one of the most widely used fin box systems for inflatable paddle boards. Typically meant for the bigger center fin, it’s where the fin attaches to the fin box slot with a screw (need screwdriver) or a hand-screwable bolt (toolless). Removing and inserting the fin is straightforward, and it’s compatible with a variety of fins (e.g “FCS II Single Fin”) designed for this fin box. It’s a more durable option. Oddly enough, there’s not much info about its origins and so forth, but I do know it’s been used for many years and will likely be used for many more. - FCS (Fin Control System) – popular premium
Usually used as the smaller snap-lock side fin boxes, coupled with the previously mentioned Standard US Fin Box as the bigger center fin box. FCS as a brand focuses on fins, so it stands to reason that there’s a good variety of fin options for the FCS snap-lock side fin boxes. - Slide-in fin boxes – popular cheap
Also known as the push-in or click-in fin boxes, another widely used simple yet effective fin box design. The fin slides into the slot and is secured with a plastic peg that is usually attached to the fin with a little cord. This one, too, is compatible with a variety of fins designed for this fin box. It’s one of the cheapest solutions (the cord has the potential to get stuck in underwater branches), so the fins, too, tend to be cheaper plastic ones (but they’re still fine for recreational paddling). - Flip-lock fin boxes – phased out
Also known as snap-in lever or quick lock fin boxes, though these are seemingly getting phased out. It has a little plastic lever or a flip that secures the inserted fin into place. It’s simple and is also compatible with the fins designed for this fin box. It’s a relatively robust option also, but the lever sizes can vary, making it confusing to know if it’s compatible with other similar fin boxes that have a different-looking lever. - Fixed molded fin boxes – permanent
It’s as it sounds: the fin is molded with the fin box. It’s a permanent, unremovable, fixed-in-place fin + fin box combo. It’s a fin and fin box in one. Usually installed as permanent unremovable side fins. - Brand-specific fin boxes
Yeah…

